THIS
PAGE IS ALWAYS UNDER CONSTRUCTION, SO PLEASE VISIT AGAIN.
THE
AFRIBORIAN HERALD: THE CAMPAIGN GAZETTE.
The Afriborian Campaign is situated in
an imaginary world that resembles our own planet and its history (roughly 1874-1914),
but events that took place in our world might be set at different dates or in
different places in the Afriborian world, thus making any resemblance between
Afriboria and real history, -people, -events and -places purely a matter of
imagination.
The
"AFRIBORIAN HERALD" is the campaign gazette of the Afriborian wargame/roleplaying
campaign and reports on the events on the Dark Continent.
The
rules used for this engagement are "Afriboria
- Miniature battles in a colonial setting", fastplay card driven colonial
rules (downloadable for free at http://www.tsoa.be/ - Antwerp Fusiliers rules
section). This battle was played solo, with 4 command cards per side.
The event cards relating to wild animals were removed from the "event cards"
deck. Each turn, the solo player picked 2 command cards (his choice) from the
hand of the active side and casts 1D6. 1-3 activated the first card, 4-6 the
second. Pretty straightforward, but it worked rather well.
TO VIEW THE SCENARIO NOTES CLICK HERE.
*****
THE AFRIBORIAN HERALD **** issue 8
****** THE EYES AND EARS OF THE DARK CONTINENT ****** |
||
|
||
"THE
FOUR FEATHERS".
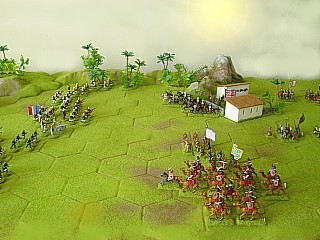
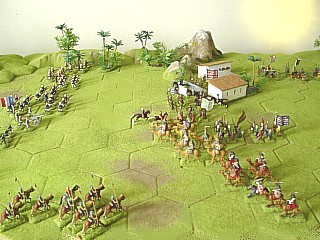
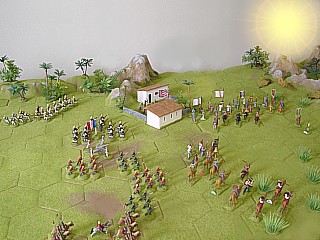
"Battle for Maxim's". The gateway to the Valley of Death. |
||
After
leaving the basecamp, Lord Hamilton rode at the head of the British columm,
alone with his thoughts, cursing the "Four Feathers" for their
reckless safari and the French for having failed to liberate the women
from the Dahnists at el Tap. Now here he was - under the alias of Colonel
F. Earsome - at the head of an expedition not only about to take on the
allies of his own Army of the Nile, but at the same time risking a full
scale war with the tribes of the Rif. Well, best not be too pessimistic
about it; who would recognize him anyway?
As soon as he had spotted the "Maxim's" trading post through his binoculars, he halted his column and rode over to his French counterpart (nomically under his overall command) to discuss their approach. After some talk and planning, both agreed to form a "wall of steel" across the valley, with the heavy artillery, supplies and medical units to the rear. A risky business, since the Arabs would have no doubt a lot of mounted troops and once these would be able to break through the line, very little would stand in between the savages and the allied support units. Nevertheless, it was the only way to cover the whole width of the valley... 
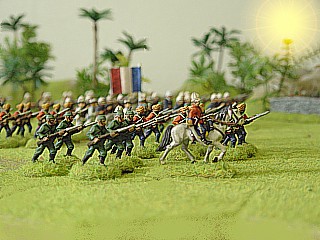
Thus the French deployed to the left (facing the trading post) with the Indistani to their right and the Bengal lancers (commanded by Hamilton himself) covering the right flank. The (French) artillery was posted in the centre. 
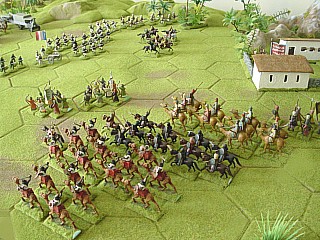
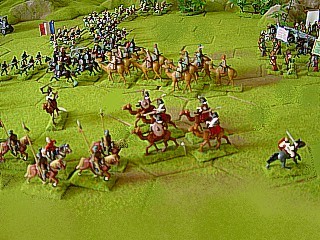
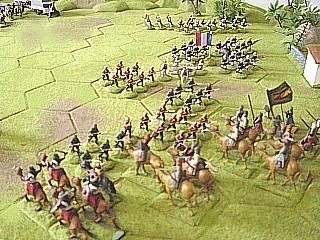
Riding back to his troops, Hamilton cursed again; here he was in the middle of nowhere, faced by savage hords, while at around this time his new "toy" ("HMS Oystercatcher") was about to be launched. Damn all skirts, damn all Frenchies !!!! His thoughts were interrupted by the sound of hooves, hundreds and hundreds of'm; the way into the "Valley of Death" was barred and battle about to be joined... |
||
![]() |
![]() |
![]() |
The
French contingent (on the allied left) opens the battle by carefully wheeling
towards the trading post, taking care not to break the allied line. The
Arabs swiftly react by posting a cavalry "company" in front
of the post, thus coming within long range fire of the French (*1).
|
The
allied line halts and the cavalry on the Arab right (tired of being
shot at) charges the French (*2). Meanwhile, two Arab archer units engage
the French artillery by long range fire (*3). On the Arab left, the
camelry and the rest of the cavalry is being concentrated, ready to
charge (*4).
|
Lord
Hamilton, splendidly leading his Bengal lancers, countercharges the Dahnist'
camelry and eliminates two out of three units, driving off their Tribal
Overlord in the process (*5). In the centre, the rest of the Arab camelry
and cavalry engages the British infantry (*6).
|
![]() |
![]() |
![]() |
Unfortunately,
during the clash with the Dahnist' camelry, Lord Hamilton is recognized
by the enemy commander who at one time had served with the army of the
Nile. His cover is blown...
|
The
Arab mounted warriors - having taken a severe beating - fall back to the
line of the trading post. A fresh unit of Dahnist' camelry enters the
field (*7). The Bengal lancers, though having suffered 30% casualties,
hold their ground (*8).
|
Lord
Hamilton now feels victory is within his grasp and, posting his lancers
slightly to the rear to cover the allied train, he positions himself near
the end of the infantry line for the final charge (*9).
|
![]() |
![]() |
![]() |
The
entire allied infantry line moves forward at the double (*10), striking
hard at the remnants of the Arab forces. The French line infantry suffers
its first casualties due to fire from the trading post as does the Ghurka
unit on the extreme allied right (*11).
|
The
advancing French line infantry is being engaged by the archers in the
trading post and suffers some losses. However, their devastating return
fire throws back the defenders (*12).
|
The
shock of the allied infantry charge has done the trick: the Arab forces
leave the field (*13), the trading post is taken and the entrance to the
"Valley of Death" lies wide open. A major battle has been won,
but the campaign is not over yet...
|
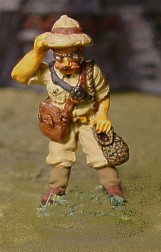
![]() Major Rick (alias Prof. R. Norton) with "a licence to kill". |
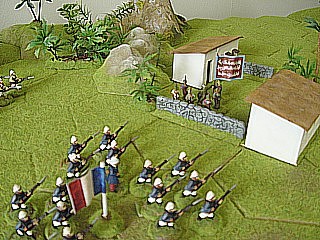
After
the battle, the allied commanders decided to make camp near the trading
post and to march into the "Valley of Death" the next day.
Later that night, a Rif tribe party entered the camp under a flag of
truce. They were accompanied by a young man and an elderly lady who
turned out to be Maxim's son and the Belgian Mevrouw (mrs) Van Lancker!
The Tribal Overlord leading the Rif party announced to Lord Hamilton
that the Dahnists had left the Rif under protection of a Rif force,
taking their other prisonsers and the captured artillery with them.
The "DOW" offered to give up young Maxim and Mrs Van Lancker
as a token of his good will in exchange for a ceasefire. Hamilton accepted.
After all, he was here to free the "Four Feathers", not to
continue a bloody war against the Rif... |
BATTLE
NOTES.
|
(*1): (turn 1) Actually a fake advance by the French: they were certainly not planning to break the allied line by storming the post to gain 2 victory points... However, the Arabs thought this to be their intention, so they moved forward their cavalry, with the result the French hoped for... (*2): ... being the Arab cavalry coming into range of the French infantry, who - at standstill - could fire twice each turn they had the right card to play. The Arabs could now either retreat or charge. They chose the latter, but couldn't break through the French line and - after suffering 60% casulaties - were forced to retreat. (*3): Another failed attack: the C-class Arab archers were no match for the allied artillery, but one never knows... The main Arab charge prepared (*4) and executed (*6): all their remaining cavalry and camelry pinned against the allied centre and right flank. This is were it could have happened, but as the allied commanders had blocked (rather thinly...) the whole width of the valley. The Rif tribes' cavalry and camelry were squeezed in between their own infantry and the Dahnist' camelry and were forced back by the immobile allied infantry and artillery. (*5) A breakthrough on the extreme allied right was likely, but the fact that the Bengal lancers positioned there could add two dice for both units (A-class lancers & officer present) against the Dahnist' C-class camelry, proved too much. In a fierce fight (the allies were able to play a "hit & run" card as well), two of the camel units were anihilated. On the other hand, the lancers also suffered 40% casualties. In all, it was a close call... (*7): At last a bit of luck for the Arabs: they played the "Reinforcements" card, received a cavalry unit, casted a die to decide the quality of the newly arrived (1-3: B-class, 4-6: C-class; it proved to be "C") and choose to add a (C-class) camelry unit to the much weakened Dahnist' contingent. (*8): Taking into account their casualties, the Bengal lancers were pulled back slightly, since they were the only allied cavalry available to react to (a still possible) Arab cavalry breakthrough. (*9) Lord Hamilton however moved forward (a bold move, since the Arabs played a "sharpshooter" card against him, but missed...). (*10): The allies played a "forced march" card, enabling their whole infantry line to move forward at the double. Wisely, they stopped one hex short of the Arab line and fired a volley, (eliminating the remnants of 2 Arab cavalry units) whilst the French regulars came under fire (*11) from the archers in the post, losing 2 figures in the process. However, the French' return fire drove the (C-class) archers back one hex (*12). (*13): The Arabs, short of "special" cards were unable to move more than 2 units and received a double volley in one turn by (part of) the (immobile) allied infantry. An Arab infantry unit and a Dahnist' camelry unit evaporize, bringing the allied points total up to 6. The allied victory has taken 17 turns to accomplish with a loss of 4 Bengal lancer figs, two Ghurka figs and two French regular figs. |